Cisco 9971 IP Phone with FreePBX / Asterisk
Introduction
So I finally bothered to get it working - a cisco telepresence series 9971 IP phone with the following capabilities:
- Extension to extension calling (Ok, any phone system can do this)
- Voicemail
- Video chat (to the same model of phone)
- Inbound calling (from PSTN)
- Outbound calling (to PSTN)
- Custom phone background images
- Custom hard button shortcuts / speed dials
- Custom on hold music
- Plus likely a lot more features I don't use or know about...
The difficulty I had with this setup is not having any idea where to start, after doing research into these phones I was still quite far away from any success. I'd previously managed to create a Cisco Unified Communications Manager (CUCM) virtual machine which was capable of extension-extension calling but I really wanted the ability to make outbound calls.
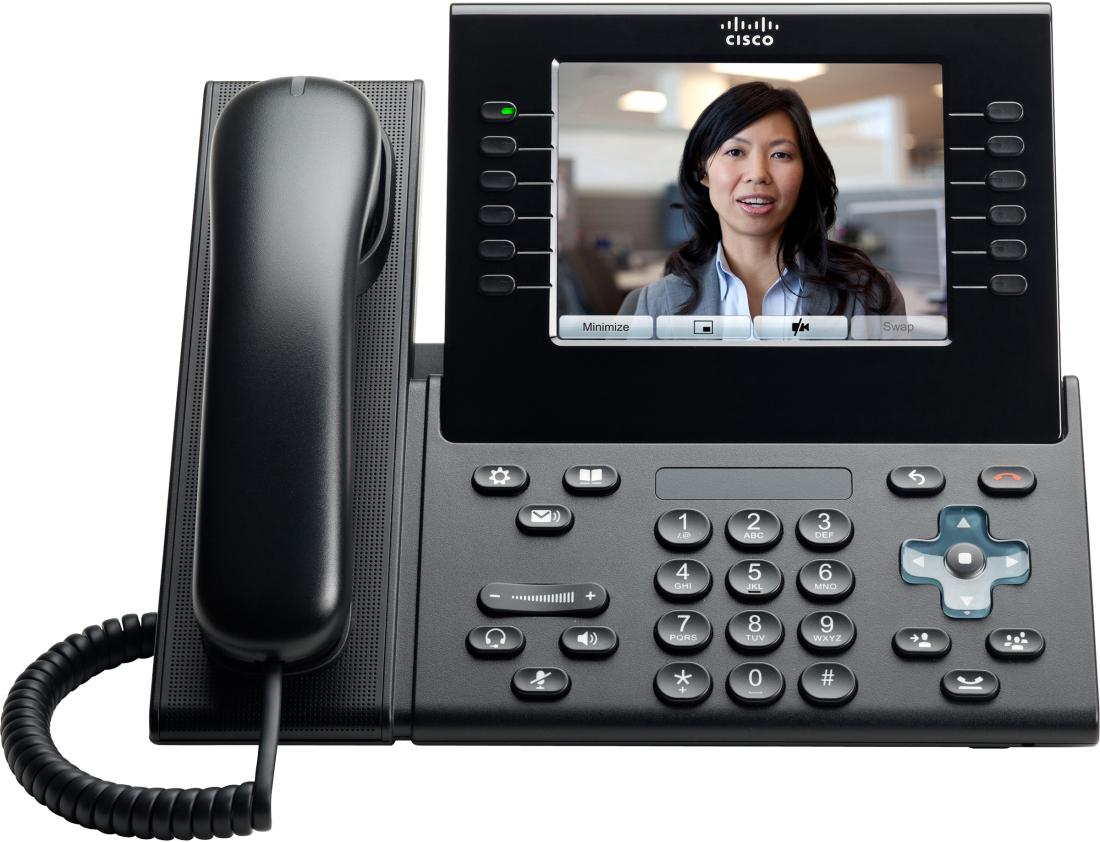
The phone in question:
Voice Lingo
Before we get into the nitty gritty I want to build a glossary of the terms which I encountered which I'd perhaps heard of but was not entirely sure of - some may seem obvious but if you've never touched VoIP before then this may save some time.
- Extension - A phone number within your VoIP network
- DID - Direct Inward Dial (number), this is something you purchase from a SIP trunk provider which gives you an external phone number to call out of or call to.
- SIP - Session Initiation Protocol, this is what establishes calls between endpoints (phones). I knew about this one already but it's fairly important so I threw it in.
- SIP Trunk - A virtual network connection which joins your PBX system to a VoIP providers infrastructure. These are usually free by themselves, but generally useless without a DID (which you do have to pay for).
- PBX - Public Branch Exchange - This is just a telephone exchange, in this case, your FreePBX server.
- CID - Caller ID, a phone number associated with a particular setting.
- PSTN - Public Switched Telephone Network, the rest of the phone world outside your own little setup.
FreePBX
First things first, FreePBX - what a fantastic piece of software! Easy enough to install, download the ISO (I had problems with the download initially, hopefully that's been resolved by now).
After downloading the ISO I installed it on a VM within my personal ESXi infrastructure. Already I had problems - what settings do I use! At this point I didn't even know what FreePBX was based on. After a little research I found some settings which worked for me:
- VM Guest OS: Other Linux x64
- RAM: 2G
- vCPUS: 2
- Hard Disk 50GB (Thin provisioned of course)
My deployment is only designed for two phones, however I expect these settings would scale reasonably nicely since the VM currently sits completely idle.
Installation
Standard installation mechanism, mount the ISO and follow the instructions, simple enough.
One thing which caught me on installation: DNS! Make sure you have a valid DNS server specified and that any IP settings you use (via DHCP or static) that the FreePBX installation can access the internet. In my case I specified two DNS servers delimited by a space.
This failed! I received an error post-installation with the option to re-run a startup / firstboot script. After accessing the GUI everything was crippled and I could not perform any tasks. I re-installed and specified only a single DNS server. I'm unsure whether the DNS servers are comma delimited or if the installation wizard simply only support a single server to be configured.
If all goes well, FreePBX will connect to the internet after installation on first boot and download a whole bunch of packages and updates, this took around 20 minutes for me so be patient.
Apart from the initial issues, installation went as planned and I was greeted with a simple linux login prompt.
Initial Configuration
Experience has taught me that systems like FreePBX have GUIs, and I knew it had a GUI as I'd seen screenshots during research. Normally I'm a CLI guy, but when I've got no idea what I'm doing a GUI is much better to bumble around in.
I accessed the IP I had configured via HTTP and was greeted with a log in prompt - perfect!
Being an inquisitive guy I took immediately to poking around....and was amazed at the amount of sheer "stuff" that was in the menus, each option lead to pages of buttons and menus describing features and solutions which I'd never even heard of! Time to back out of that before you get completely lost.
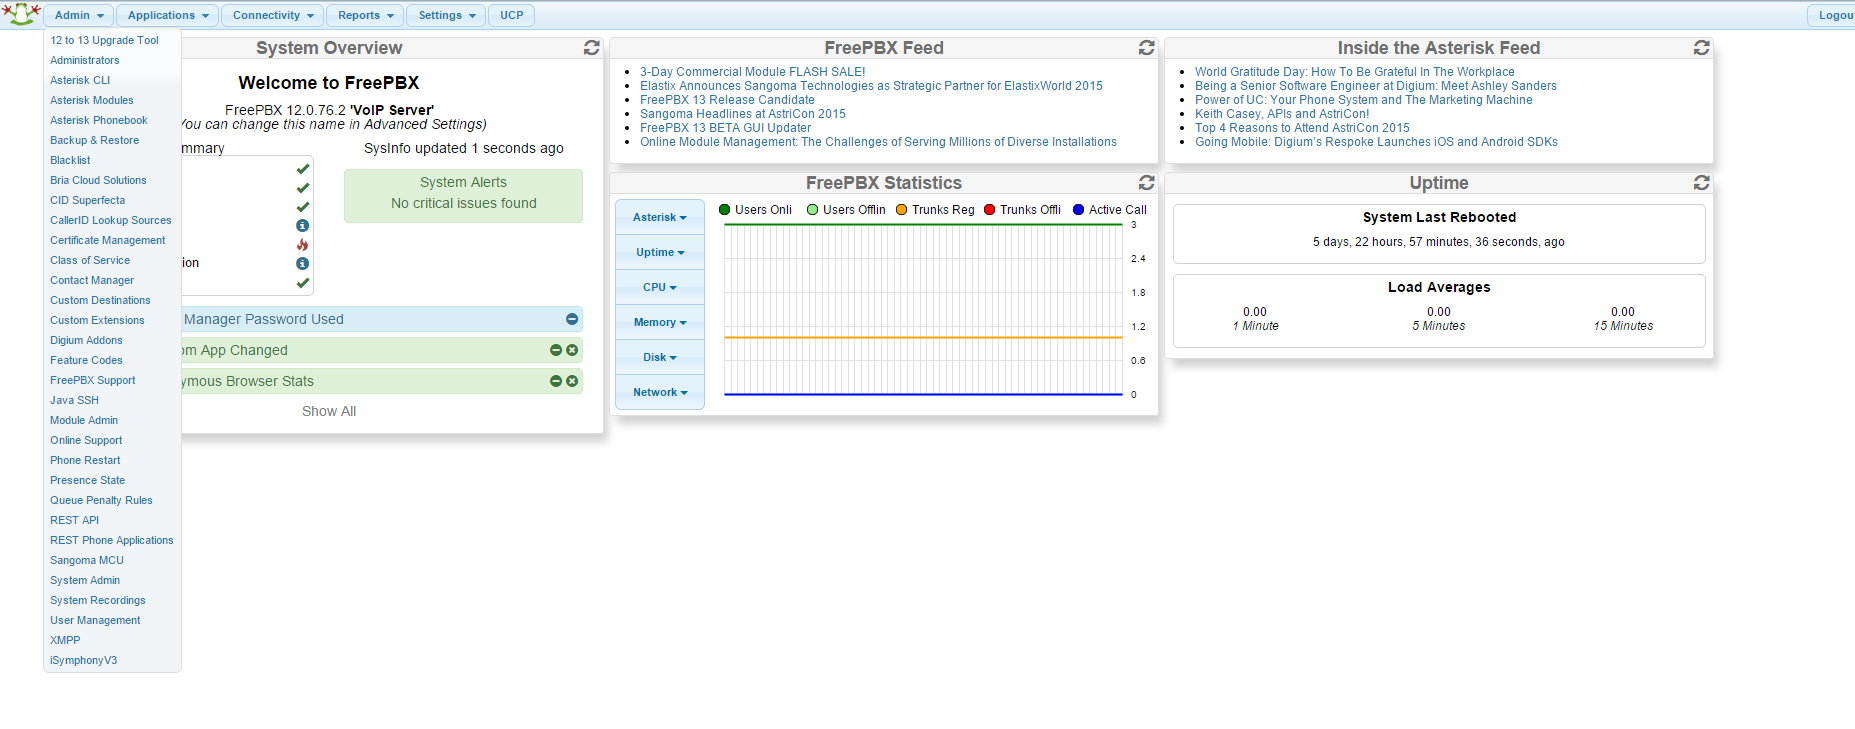
My FreePBX home screen and one of it's menus:
Asterisk SIP over TCP
Asterisk (the main component of FreePBX) requires TCP be enabled in order for the 9971 series to function correctly, at least this is something I came across in my research.
In order to enable TCP in asterisk it must be enabled globally and for each extension. This can be done by editing a file called sip_general_custom.conf and adding the following options:
tcpenable=yes tcpbindaddr=0.0.0.0
If you cannot find the file you can use the following command in linux to find it:
find / -name sip_general_custom.conf
I believe also that these changes can be made without editing the file by making use of the Advanced General Settings within Asterisk. (Settings>Asterisk SIP Settings>Advanced General Settings) however I'd already added the above to sip_general_custom.conf before I tried this.
We'll cover how to enable TCP per extension in an upcoming section.
Extensions
Each extension is a phone number within your system, these are configured (Applications>Extensions).
We need to create an extension for each user or number, for this we want to use Generic CHAN SIP Device
I filled in the following settings and left the rest as default:
-Edit Extension
- User Extension: A phone number, I used:
1001 - Display Name: What your phone will display when someone calls:
David Chidell - SIP Alias: Some sort of friendly name, I kept this as me:
David Chidell
-Extension Options
- Outbound CID: The DID number provided by your VoIP ISP (we'll cover these later):
441297xxxxxx
-Device Options
- Secret: A SIP login secret, my network is private so I left this blank.
- NAT Mode: Not entirely sure what this actually does! However disabled.
- Transport: Important! Select
TCP Only
-Voicemail
- Status: Hopefully self explanatory:
Enabled - Voicemail Password: Left this blank.
Submit!
After each change you will have to Apply Settings at the top of the screen - this should be highlighted in red.
Music On Hold
Now while this is not particularly important, it's great fun and I hit a little problem in the meantime.
Navigate within FreePBX to Settings>Music On Hold. Here you can upload a .mp3 or .wav file which will play when you put someone on hold. You can even add multiple and it'll select a random one.
Just a quick tip before you start loading files into FreePBX - Rename them first! I had a problem where I uploaded an MP3 file with some special characters in (commas, full stops, think there was an apostrophe in there too) and I could not delete it! When I attempted to delete the file it would not get processed by the web parser and throw an error because of the special characters. As a result I had to work out how FreePBX stored the files, my worry was it added the file to a database somewhere and I'd have to go into it and remove the filename from some sort of index. Not to worry though - it doesn't. You can simply SSH to the box and unlink the file (rm does not work, you must use unlink to remove it completely). It should then disappear from the GUI.
Basic Testing
Just to make sure FreePBX is working, I used a program called X-Lite in order to test my extension configuration. Sure enough we don't have any phones setup, or any external connectivity however I found X-Lite valuable for troubleshooting issues along the way.
In terms of configuration for X-Lite it's very basic. Under Softphone>Account Settings>Account you need the following options:
- User ID: Your extension number,
1001 - Domain: Your FreePBX Server IP:
10.0.20.21 - Password: SIP Extension password, blank in my case.
Softphone>Account Settings>Transport: Signaling transport may need to be set to TCP.
After this you should be able to log in and call multiple X-Lite instances!
The 9971 Phone
Onto the main event! I had absolutely no idea where to even begin, however with a little poking around and a nudge in the right direction I eventually got there.
Phone configuration is performed via an XML file which is downloaded from a TFTP server when the phone boots. This has a couple of prerequisites:
- A TFTP Server - Luckily FreePBX has one built in!
- A router capable of setting DHCP option 150 (I'm using a cisco router here, so no problems!)
The XML file itself is constructed using the following filename format:
SEP<PHONE MAC ADDRESS>.cnf.xml
For example if your phones MAC address is AA:BB:CC:DD:EE:FF the filename would be:
SEPAABBCCDDEEFF.cnf.xml
Hexadecimal letters MUST be in capitals!
After much tweaking I have come up with the following configuration:
<?xml version="1.0" encoding="UTF-8"?>
<device>
    <advertiseG722Codec>1</advertiseG722Codec>
    <deviceProtocol>SIP</deviceProtocol>
    <sshUserId>admin</sshUserId>
    <sshPassword>password</sshPassword>
    <devicePool>
        <dateTimeSetting>
            <dateTemplate>D/M/YA</dateTemplate>
            <timeZone>GMT Standard/Daylight Time</timeZone>
            <ntps>
                <ntp>
                    <name>pool.ntp.org</name>
                    <ntpMode>Unicast</ntpMode>
                </ntp>
            </ntps>
        </dateTimeSetting>
        <callManagerGroup>
            <members>
                <member priority="0">
                    <callManager>
                        <ports>
                            <ethernetPhonePort>2000</ethernetPhonePort>
                            <sipPort>5060</sipPort>
                            <securedSipPort>5061</securedSipPort>
                        </ports>
                        <processNodeName>10.0.20.21</processNodeName>
                    </callManager>
                </member>
            </members>
        </callManagerGroup>
    </devicePool>
    <sipProfile>
        <sipProxies>
            <backupProxy />
            <backupProxyPort>5060</backupProxyPort>
            <emergencyProxy />
            <emergencyProxyPort />
            <outboundProxy />
            <outboundProxyPort />
            <registerWithProxy>true</registerWithProxy>
        </sipProxies>
        <sipCallFeatures>
            <cnfJoinEnabled>true</cnfJoinEnabled>
            <callForwardURI>x-serviceuri-cfwdall</callForwardURI>
            <callPickupURI>x-cisco-serviceuri-pickup</callPickupURI>
            <callPickupListURI>x-cisco-serviceuri-opickup</callPickupListURI>
            <callPickupGroupURI>x-cisco-serviceuri-gpickup</callPickupGroupURI>
            <meetMeServiceURI>x-cisco-serviceuri-meetme</meetMeServiceURI>
            <abbreviatedDialURI>x-cisco-serviceuri-abbrdial</abbreviatedDialURI>
            <rfc2543Hold>false</rfc2543Hold>
            <callHoldRingback>2</callHoldRingback>
            <URIDialingDisplayPreference>1</URIDialingDisplayPreference>
            <localCfwdEnable>true</localCfwdEnable>
            <semiAttendedTransfer>true</semiAttendedTransfer>
            <anonymousCallBlock>0</anonymousCallBlock>
            <callerIdBlocking>2</callerIdBlocking>
            <dndControl>0</dndControl>
            <remoteCcEnable>true</remoteCcEnable>
            <retainForwardInformation>false</retainForwardInformation>
        </sipCallFeatures>
        <sipStack>
            <sipInviteRetx>6</sipInviteRetx>
            <sipRetx>10</sipRetx>
            <timerInviteExpires>180</timerInviteExpires>
            <timerRegisterExpires>3600</timerRegisterExpires>
            <timerRegisterDelta>5</timerRegisterDelta>
            <timerKeepAliveExpires>120</timerKeepAliveExpires>
            <timerSubscribeExpires>120</timerSubscribeExpires>
            <timerSubscribeDelta>5</timerSubscribeDelta>
            <timerT1>500</timerT1>
            <timerT2>4000</timerT2>
            <maxRedirects>70</maxRedirects>
            <remotePartyID>false</remotePartyID>
            <userInfo>None</userInfo>
        </sipStack>
        <autoAnswerTimer>1</autoAnswerTimer>
        <autoAnswerAltBehavior>false</autoAnswerAltBehavior>
        <autoAnswerOverride>true</autoAnswerOverride>
        <transferOnhookEnabled>false</transferOnhookEnabled>
        <enableVad>false</enableVad>
        <dtmfAvtPayload>101</dtmfAvtPayload>
        <dtmfDbLevel>3</dtmfDbLevel>
        <dtmfOutofBand>avt</dtmfOutofBand>
        <alwaysUsePrimeLine>false</alwaysUsePrimeLine>
        <alwaysUsePrimeLineVoiceMail>false</alwaysUsePrimeLineVoiceMail>
        <kpml>3</kpml>
        <phoneLabel>DCHIDELL</phoneLabel>
        <stutterMsgWaiting>2</stutterMsgWaiting>
        <callStats>false</callStats>
        <silentPeriodBetweenCallWaitingBursts>10</silentPeriodBetweenCallWaitingBursts>
        <disableLocalSpeedDialConfig>false</disableLocalSpeedDialConfig>
        <sipLines>
            <line button="1">
                <featureID>9</featureID>
                <featureLabel>David Chidell - 1001</featureLabel>
                <proxy>USECALLMANAGER</proxy>
                <port>5060</port>
                <name>1001</name>
                <displayName>1001</displayName>
                <autoAnswer>
                    <autoAnswerEnabled>0</autoAnswerEnabled>
                </autoAnswer>
                <callWaiting>3</callWaiting>
                <authName>1001</authName>
                <authPassword>xxxxx</authPassword>
                <sharedLine>false</sharedLine>
                <messageWaitingLampPolicy>1</messageWaitingLampPolicy>
                <messagesNumber>*97</messagesNumber>
                <ringSettingIdle>4</ringSettingIdle>
                <ringSettingActive>5</ringSettingActive>
                <contact>1001</contact>
                <busyTrigger>2</busyTrigger>
                <forwardCallInfoDisplay>
                    <callerName>true</callerName>
                    <callerNumber>false</callerNumber>
                    <redirectedNumber>false</redirectedNumber>
                    <dialedNumber>true</dialedNumber>
                </forwardCallInfoDisplay>
            </line>
            <line button="2">
                <featureID>21</featureID>
                <featureLabel>Voicemail</featureLabel>
                <speedDialNumber>*97</speedDialNumber>
            </line>
            <line button="3">
                <featureID>21</featureID>
                <featureLabel>Toggle Busy</featureLabel>
                <speedDialNumber>*76</speedDialNumber>
            </line>
            <line button="4">
                <featureID>21</featureID>
                <featureLabel>Billy Grant</featureLabel>
                <speedDialNumber>1002</speedDialNumber>
            </line>
            <!--
            <line button="2">
              <featureID>2</featureID>
              <featureLabel>David Soft Phone</featureLabel>
              <speedDialNumber>1000</speedDialNumber>
            </line>
            -->
        </sipLines>
        <voipControlPort>5060</voipControlPort>
        <startMediaPort>16348</startMediaPort>
        <stopMediaPort>20134</stopMediaPort>
        <dscpForAudio>184</dscpForAudio>
        <ringSettingBusyStationPolicy>0</ringSettingBusyStationPolicy>
        <dialTemplate>dialplan.xml</dialTemplate>
        <softKeyFile />
    </sipProfile>
    <commonProfile>
        <phonePassword />
        <backgroundImageAccess>true</backgroundImageAccess>
        <callLogBlfEnabled>2</callLogBlfEnabled>
    </commonProfile>
    <loadInformation>sip9971.9-4-2SR2-2</loadInformation>
    <inactiveLoadInformation>sip9971.9-4-2SR2-2</inactiveLoadInformation>
    <vendorConfig>
        <g722CodecSupport>1</g722CodecSupport>
        <handsetWidebandEnable>1</handsetWidebandEnable>
        <headsetWidebandUIControl>1</headsetWidebandUIControl>
        <disableSpeaker>false</disableSpeaker>
        <disableSpeakerAndHeadset>false</disableSpeakerAndHeadset>
        <pcPort>0</pcPort>
        <settingsAccess>1</settingsAccess>
        <garp>1</garp>
        <voiceVlanAccess>1</voiceVlanAccess>
        <videoCapability>1</videoCapability>
        <autoSelectLineEnable>0</autoSelectLineEnable>
        <webAccess>0</webAccess>
        <daysDisplayNotActive></daysDisplayNotActive>
        <displayOnTime>08:00</displayOnTime>
        <displayOnDuration>16:00</displayOnDuration>
        <displayIdleTimeout>00:10</displayIdleTimeout>
        <spanToPCPort>0</spanToPCPort>
        <loggingDisplay>1</loggingDisplay>
        <ciscoCamera>1</ciscoCamera>
        <loadServer />
    </vendorConfig>
    <userLocale>
        <name>English_United_Kingdom</name>
        <uid />
        <langCode>en</langCode>
        <version>1.0.0.0-1</version>
        <winCharSet>iso-8859-1</winCharSet>
    </userLocale>
    <networkLocale>United_Kingdom</networkLocale>
    <networkLocaleInfo>
        <name />
        <uid />
        <version>1.0.0.0-1</version>
    </networkLocaleInfo>
    <deviceSecurityMode>1</deviceSecurityMode>
    <authenticationURL />
    <directoryURL />
    <servicesURL />
    <idleURL />
    <informationURL />
    <messagesURL />
    <proxyServerURL />
    <dscpForSCCPPhoneConfig>96</dscpForSCCPPhoneConfig>
    <dscpForSCCPPhoneServices>0</dscpForSCCPPhoneServices>
    <dscpForCm2Dvce>96</dscpForCm2Dvce>
    <transportLayerProtocol>1</transportLayerProtocol>
    <capfAuthMode>0</capfAuthMode>
    <capfList>
        <capf>
            <phonePort>3804</phonePort>
        </capf>
    </capfList>
    <certHash />
    <encrConfig>false</encrConfig>
</device>
Most options can be left as default but here are a few I would recommend changing or are worth noting:
<processNodeName>10.0.20.21</processNodeName> - This must be the IP address of your FreePBX server.
<phoneLabel>DCHIDELL</phoneLabel> - This appears at the top of the phone. WARNING it is limited to 13 characters! Any more and the phone will not accept the configuration!
<featureLabel>David Chidell - 1001</featureLabel> - This is under the line configuration. This means that configuration in this <line> section is specific to a SIP line on the phone. You can have multiple lines coming into a phone so the phone will ring in response to calls from multiple extensions. In my configuration I only need one per phone. This label itself is however visual only.
<proxy>USECALLMANAGER</proxy> - This is NOT something you can change, it MUST remain unchanged or the phone will fail to register.
<name>1001</name>
<displayName>1001</displayName>
<authName>1001</authName>
<contact>1001</contact>
I've grouped these since I set them all to the same, here I've set all of these to be my extension number however the only one which really makes a difference and MUST be set is <authName>1001</authName> which defines the extension number you're logging into.
<authPassword>xxxxx</authPassword> - This is the SIP password you set when creating the extension in FreePBX. If the password in your extension is blank, this can be set to anything.
<line button="2"> <featureID>21</featureID> <featureLabel>Voicemail</featureLabel> <speedDialNumber>*97</speedDialNumber> </line>
This handy little chunk is how hard buttons are defined. Similar to the SIP line configuration above this creates a button you can press to perform a particular function. In this case the second button which is the second hard button on the left side of the screen.
The <featureID> section describes what feature the phone is expecting to use, more of these are documented HERE.
The label is purely cosmetic and is displayed on the screen next to the button, and the <speedDialNumber> should be fairly self explanatory in that this chunk of code creates a speeddial button to *97 which is the number for voicemail in FreePBX. This code can be repeated by changing the button number in <line button="2"> to create as many buttons as you wish.
<dialTemplate>dialplan.xml</dialTemplate> - This is used to define a dialplan for the phone. A dialplan is a list of number ranges which the phone will recognise and call numbers instantly based on what you type. For example, if you use internal extensions of 4 digits all of them starting with the number 1; using this file you can define that as soon as you type any 4 digit number starting with a 1 the phone will instantly start calling it. More will be added on this file structure later.
<loadInformation>sip9971.9-4-2SR2-2</loadInformation> <inactiveLoadInformation>sip9971.9-4-2SR2-2</inactiveLoadInformation>
These lines indicate the firmware version you want to use on the phone itself. You can download firmware packages from the cisco website in the form of a zip file. This zip must be extracted to the root directory of your TFTP server, the phone will download the firmware when it first connects to the TFTP server and reboot. NOTE: the phone does NOT change its message when upgrading and continues to show as unregistered, in order to check if the phone is upgrading use the settings button (marked with a cog / gear icon) and select Phone Information. This will display the current status of the upgrade procedure.
<pcPort>0</pcPort> - This would seem self explanatory however is counter intuitive. The PC port is great if you've got a single ethernet termination point and wish to connect a PC as well. The only documentation I could find dictated that 0 was disabled and 1 was enabled WRONG! If you want to use the PC port it must be set as above, to 0! 0 is enabled, 1 is disabled.
<daysDisplayNotActive> </daysDisplayNotActive>
<displayOnTime>08:00</displayOnTime>
<displayOnDuration>16:00</displayOnDuration>
<displayIdleTimeout>00:10</displayIdleTimeout>
I had fun with these directives; controlling when the phones screen turns on and off.
The first, <daysDisplayNotActive> is to determine which days of the week the display is always turned off on, this would commonly be used in an office environment on the weekend. The days are in the format of 1-7 where 1 is Sunday, 2 is Monday and 7 is Saturday etc. I've got my phone at home, so I want it to be on every day, hence blank.
<displayOnTime>08:00</displayOnTime> - This is used to determine when (usually in the morning) you wish the display to actually turn on.
<displayOnDuration>16:00</displayOnDuration> - This is how long after the <displayOnTime> directive to turn off the phone display. I found this rather odd since I was expecting a directive to turn the display off at a certain time. However I wanted my phone to turn off at midnight, which is 16 hours after 8am, hence the 16:00. If you want your phone display to be on all the time, set this to 24:00.
<displayIdleTimeout>00:10</displayIdleTimeout> - This is how long the phone display should stay on for if the phone is activated when the screen would otherwise be off.
There is additional documentation on the directives described HERE.
Post Phone Configuration
The information above should be enough in order to get the 9971 phone registered to FreePBX on the version of code required and connected to the defined extension. We still have several configuration items (specific to the phone) to go through however:
- Dial plans
- Phone screen background images
- Ringtones (I've not played with these yet, so I don't have a great deal of info)
- Locale settings (Mine are configured as the UK in the above configuration)
Dial Plans
As described above, a dial plan is a template of numbers which corresponds to timeouts when dialing. This is not a critical component however it makes dialing easier and allows the use of the call forwarding and conference features (these features don't work properly otherwise).
My dial plan is as follows (bearing in mind I am based in the UK):
<DIALTEMPLATE>
	<TEMPLATE match="1..." Timeout="0"/>
	<TEMPLATE match="07........." Timeout="0"/>
	<TEMPLATE match="0........*" Timeout="2"/>
	<TEMPLATE match="*" Timeout="3"/>
</DIALTEMPLATE>
This should be simple enough to understand, on a line by line basis.
<TEMPLATE match="1..." Timeout="0"/> - This matches my internal extensions, these are 4 digit numbers starting with the number 1. If the number 1 is typed and followed by 3 numbers (i.e. 1000 to 1999) the phone will instantly call the number without waiting.
<TEMPLATE match="07........." Timeout="0"/> - Similar to above, this matches mobile numbers as they begin with 07 and have 11 digits. When this pattern is matched, the phone will dial instantly.
<TEMPLATE match="0........*" Timeout="2"/> - Again similar, however this time I've used the * character which matches any number of numbers after it. This is because I know of some numbers which do not fit exactly into a standard landline length.
<TEMPLATE match="*" Timeout="3"/> - The catch all at the end, after each number, the timeout will be 3 seconds before actually calling the number. I may need to adjust this at some point if I'm a bit slow to dial!
This file needs to be uploaded in the TFTP root directory and named what has been specified in the <dialTemplate>dialplan.xml</dialTemplate> directive. In my case dialplan.xml.
More information on dial plan templates can be found HERE.
Background Images / Wallpaper
These are even more fun than the screen timeouts! Who doesn't want a custom picture on their phone!
By default you'll find two typically corporate backgrounds which Cisco bundle into the phone however I fancied something with a bit more colour in it.
The 9971 phone has a display of 640x480 pixels with a colour depth of 24. Different phones have different locations where images must be placed in order to be read by the phone. Images are read from a TFTP server in two nested directories. First create a directory called Desktops inside the root of the TFTP server and then inside that a folder called 640x480x24. Images can then be placed inside this folder, however they must also be defined in a file indexing the images which the phone reads each time you access the Menu inside Settings>Preferences>Wallpaper.
This file MUST be called List.xml and be placed inside the 640x480x24 folder. The structure of my file is as follows:
<CiscoIPPhoneImageList>
<ImageItem Image="TFTP:Desktops/640x480x24/galaxy-123x111.png" URL="TFTP:Desktops/640x480x24/galaxy.png" />
</CiscoIPPhoneImageList>
The contents of this file should be fairly self explanatory however the contents are important.
Image="TFTP:Desktops/640x480x24/galaxy-123x111.png This section defines the thumbnail icon which is displayed when you enter the wallpaper menu to pick which you want to use. The resolution should be 123x111 pixels and the file format MUST be .png.
URL="TFTP:Desktops/640x480x24/galaxy.png" - This section describes the file itself which will be set as the background of your phone. This must be 640x480 pixels and also be in a .png format.
Up to 50 images can be defined in this list, all must be PNG however I've not had any problems with size (mine is about 1MB which seems rather large for a 640x480 image).
Ringtones
I've not actually got any ringtones working as at the current stage I am satisfied with the standard Cisco ringtone which comes with the phone (you get two to choose from). However from at least looking into them they're fairly easy to configure and quite similar to configuring the background images. Since I do not have any examples, information regarding ringtones can be found HERE.
Locale Settings
To be honest, I don't really know what these are for. I just got annoyed with the error messages in the phones log when it was trying to find something which did not exist!
As I understand it, it's basically the language settings which exist within the phone. However I have no idea why there would really be a difference between the UK and the US (which appears to be the default), but I wanted to change it anyway.
First you'll have to download the locale files from www.cisco.com. This locale file then needs converting and the contents of the converted file extracting to your FreePBX TFTP server. Since I've nothing to really add to this process check this link HERE.
You should be able to perform the linux related commands on the FreePBX server itself and create the perl script on it. Personally I used another linux server (merely because I was already logged into it at the time) and copied the files over using SCP.
Phone Summary
By now the phone should be pretty happy and capable of calling other phones "of its kind". The only part which we have left is actually getting our calls routed out to the public phone network, which requires a little more configuration in FreePBX as well as the process of actually purchasing and activating the SIP trunk itself.
The Final Step - External Connectivity
There are many SIP trunk providers around and it may be worth doing some research into which you wish to use. Personally speaking I went with www.voip.ms which was recommended to me. After looking around at a few different providers they all seem fairly close in terms of rates and what they can do, so decided to go with what was recommended.
First, get your SIP trunk connected to FreePBX, when you've established this is working you can continue to purchase a DID (if it doesn't work, you don't want to have already paid!)
Connecting to the Trunk
You'll have been allocated a SIP username and the password is your account password. These need to be added into FreePBX. If you want to change your SIP password you can change it to be different to that of your account. You'll also need to pick a VoIP server which your SIP trunk will terminate to, again since I'm in the UK I selected the london server (london.voip.ms).
Adding the trunk is straightforward enough, navigate in FreePBX to Connectivity>Trunks and add a new SIP (chan_sip) Trunk. Call it something relevant, mine was VOIPMS which seemed appropriate.
Use the following for peer details:
canreinvite=nonat
nat=yes
context=from-trunk
host=london.voip.ms
username=YOUR-SIP-USERID
fromuser=YOUR-SIP-USERID
secret=YOUR-ACCOUNT-PASSWORD
type=peer
disallow=all
allow=ulaw
trustrpid=yes
sendrpid=yes
insecure=invite, port
qualify=yes
Substitute in your userid and password, and change the prefered host to a different voip.ms server to suit your location. The only other part you'll require is the register string which is built from details about your account in the following format:
USERID:PASSWORD@SERVER:5060
For example if your userid was 123456 and your password was hello and you're using the london.voip.ms server your register string would be the following:
123456:[email protected]:5060
After adding this save and apply, and navigate to your account page within voip.ms, from here you should be able to see the registration status of your account. It may need a refresh however it should update quickly. If you did everything correctly you should see the following:
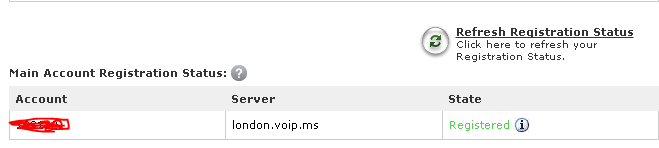
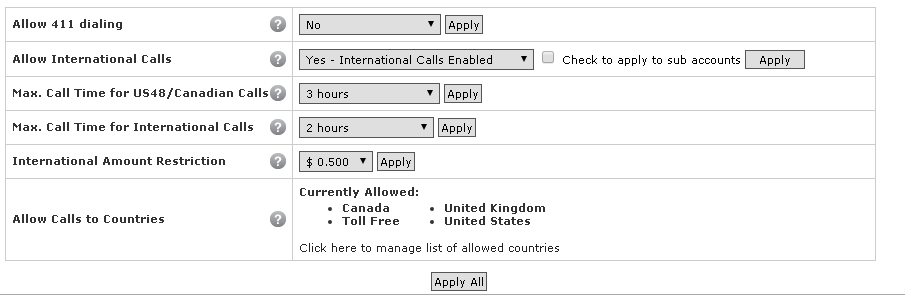
Now the trunk is registered you're almost ready to start spending money! One little gotcha I encountered along the way was I had not enabled international calling within voip.ms, meaning I was unable to make outbound calls (I hit this a little further down the line). If you're residing anywhere other than the USA or Canada you'll need to enable the locations you want to allow calls to go. This is done within voip.ms under Account Settings>Account Restrictions>Allow International Calls. You can select the countries you wish to be able to call which should be updated on the Account Settings page as below:
Getting a Number
After creating an account etc you will have to add funds to your account. This seems like quite a good way to manage things as you can add a nice lump of money into your account and forget about it for a while. You'll get emails when funds run below a certain amount (I believe the default is $10).
The next step is to purchase a DID. This is your phone number which will be presented outbound and which will be used to call your phone inbound. I reside in the UK so purchased a DID relevant to me. It can take some time for the DID to be allocated and come through, mine took about 16 hours. After you've been allocated a number you'll receive an email and it will appear in the Manage DIDs section of voip.ms
Binding your number to FreePBX
Now you've been allocated a number it's time to tie the whole thing together, this has a few steps however each is fairly short. Effectively we need to tell FreePBX what number to use outbound, and what extension to send incoming calls from a certain DID to.
Outbound Routes
In FreePBX, navigate to Connectivity>Outbound Routes and create a new outbound route. Give it a suitable name, you'll only need one Outbound Route even if you're using multiple DIDs, I called mine OR_ALL
Now is the interesting part, the outbound dial pattern. This is effectively the mechanism FreePBX uses to match a number you dialed and then send it out of the trunk instead of trying to route it internally. I wanted to just be able to make standard phone calls without any of the fancy stuff which you can get, so used the following rule:

Now lets break this down to understand what it's doing.
The first part is a prepend, which means FreePBX will silently add this to whatever matches in the following sections. Adding 0044 is required for a UK phone line as this represents the country code. This means you will not have to type it manually when calling.
The second part is a prefix, which is what will be MATCHED but REMOVED, so anything which begins with a 0 and then followed by the 3rd section.
The 3rd section is the match pattern, a Z represents any digit between 1-9 and the . (full stop) represents any quantity of numbers to follow.
So, if I dial 01297112233 this will match the rule. The leading 0 is matched by the prefix, and the 1 is matched by the Z, the rest of the number is matched by the full stop. The leading 0 is removed and pre-pended internally with 0044 and then forwarded onward as 00441297112233.
The final stage of setting up the outbound route is to select the SIP trunk you've previously set up. Save and apply the changes.
Inbound Routes
These are similar to outbound, except they work the other way. When a call comes in on a DID, it has to actually go somewhere and this is how you define where it goes.
Personally I have two phones in my VoIP network, and I wanted each to have their own external number. For this I have purchased two DIDs and I have two extensions and I wanted to bind a single DID to an extension, I'm sure you can have other functionality however I've just not done that so will stick to what I know.
If you wish to follow my footsteps and have a single DID per extension then this is how it's done. You must create (in my case two) inbound routes.
In FreePBX navigate to Connectivity>Inbound Routes, and add a route. Name is something appropriate and enter the DID you wish to use in its full form (including country code). Right at the bottom of the page set the destination to Extension and select the extension you wish to call. Submit and apply the settings.
Give it a try!
You should now be complete! From your 9971 IP phone you should now be able to make outbound calls, and receive incoming calls. Hopefully you didn't miss anything, and hopefully I didn't when writing this article. Happy phoning!
Additional Information
Some other information which may be useful:
Within FreePBX you can see the numbers available for internal services, these can be viewed by navigating to Reports>Print extensions.
Problems, defects and issues
Currently everything works - however there is still some functionality which I regret does not function correctly. Namely the following.
- Hard Voicemail button - I'd love to know how to bind the phones voicemail button to the *97 service which FreePBX provides. I don't know if it's even possible!
- Persistent call bug / issue - When a caller hangs up while they're calling you, or if you get a missed call the call appears to "stick" on the screen. This frustrates me greatly and I've heard reports of others having this issue. I've tried various fixes such as upgrading the firmware versions on the phone, downgrading etc however have not found something which fixes this issue for me. My workaround is a little linux script which sends an SNMP set to the switch my phone is plugged into every day at 4am and shuts down the port and brings it back up again so that the phone re-registers which seems to clear the issue. Not ideal by any means.
- Contacts / directory - I think this is available by patching asterisk, however this requires patching the asterisk source code and recompiling it which I really don't want to bother with. It would be nice if this was integrated into asterisk by default or some setting you can change within the phone to display the extensions which exist within FreePBX.
- Call history - I'm assuming that this is a service usually provided by CUCM rather than the phone remembering the calls it's placed or received. Again I think there is a patch which fixes it but the effort of recompiling the code puts me off.
References
-
http://community.freepbx.org/t/cisco-9971-phone-configuration-working-example-with-setup-tips/13481
-
https://github.com/dazza76/Provisioner/blob/master/endpoint/cisco/sip99xx/SEP%24mac.cnf.xml
-
http://docs.acsdata.co.nz/asterisk-cisco/sepmac-cnf-xml.shtml
-
http://labs.wrprojects.com/configuring-a-cisco-9951-phone-for-asterisk/
Acknowledgements
-
Mike R - For providing software recommendations and guiding me through various through the processes involved.
-
Billy G - For moaning constantly that he wanted a phone to the point where I finally got on with getting it working (and paying for the voip.ms service, thats quite helpful too).
-
Above authors for their contributions