"Standard / basic" cisco home router configuration
Introduction
So, you're a bit of a Cisco nerd, and you want to deploy a cisco router at home, fantastic!
Perhaps you've got a bit of Cisco background, CCNA/P or this may be from scratch but what does a "real world" configuration sample actually look like? Things from books can be a bit deceptive. Hopefully this post will provide some basic insight into the home router style of configuration.
Setup
I'm going to base this configuration on a fairly common Cisco router you're likely to be using at home - an 800 series. This guide does NOT cover wireless!
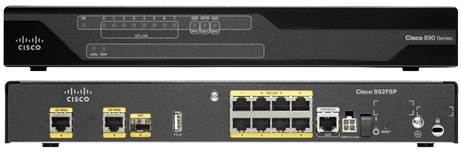
We'll assume that this 800 series has 8 gigabit LAN ports on GigabitEthernet0-7 and we're going to be using an ethernet WAN connection as well on GigabitEthernet8. Many 800 series routers actually have this configuration and have ports 0-7 configured as switch ports and 8 as a routed port which is just what we want.
If you're using another WAN connectivity method such as V/ADSL then you'll have to refer to other documentation on how to get that connection working. However the basic concepts are still transferable, and config applied to GigabitEthernet8 in this example can equally be applied to the Dialer interfaces required for those types of connection.
This guide will actually work perfectly for Virgin Media users who have converted their Virgin Media hubs into modem mode. You can also use this setup behind an existing home network if you wish to have your own separate environment from the rest of your household.
Features
The features we will be configuring is as follows:
- WAN interface configuration (GigabitEthernet8)
- LAN interface configuration (SVIs and switchports on GigabitEthernet0-7)
- NAT overload between LAN and WAN
- Inbound security using CBAC firewall
- VTY security using access lists and SSH (anyone who uses telnet in a production environment deserves to be hacked)
- DHCP pools for LAN
Configuration
Let's get started!
LAN Configuration
There are two parts for the LAN configuration, the first is the switchports themselves, and the second will be the Switched Virtual Interface (SVI) which acts as the L3 gateway for that broadcast domain.
The switchports are straightforward enough. I'm going to keep them at the bare minimum because we're looking for BASIC configuration here. So I'll use VLAN 1:
interface GigabitEthernet0-7
 description ***Some device here***
 switchport access vlan 1
 switchport mode access
 no ip address
 spanning-tree portfast
 no shutdown
end
What's going on then:
- Selecting all of our LAN interfaces
- We've got ourselves a nice description for what is actually connected to the interface
- We're setting the access VLAN to 1
- Manually setting the port to access mode
- It's a switchport, hence no ip address
- Putting the port into portfast so spanning tree doesn't take forever to converge. This is for an end device after all.
- Making sure the interface is physically up
Easy right? So now let's do the SVI which functions as the default gateway for our clients:
interface Vlan1
 description ***LAN clients***
 ip address 10.1.1.1 255.255.255.0
 ip nat inside
 no shutdown
end
Even easier! We're going to be using 10.1.1.0/24 as our LAN range, you can change this to whatever you like. I prefer the 10.0.0.0/8 private network range because it's less characters than the 192.168.0.0 range, and it has more usable subnets in.
We've also got NAT configured on this interface which is important for our NAT statements later, so don't miss it out! Don't forget to make sure it's up as well!
LAN DHCP Configuration
Now we've got out L3 interface and switchports configured we need clients to be able to connect. Unless you want to configure an IP on each client individually you're going to want to use DHCP.
ip dhcp pool LAN
 network 10.1.1.0 255.255.255.0
 default-router 10.1.1.1
 dns-server 208.67.222.222 208.67.220.220
This creates the DHCP pool named LAN (the name has no real significance). We define the network which we want to hand out, in this case the same subnet as our LAN SVI on VLAN 1. The default router is the address of our VLAN 1 SVI (our gateway), and the DNS servers above are the IP addresses for OpenDNS which is a rather fantastic DNS provider.
Since I have a few servers etc running on the LAN (and if you read this blog, and want a cisco router at home chances you do as well) you might want the first 50 addresses (I've got a lot of servers alright) or so free. So let's exclude those from DHCP allocations:
ip dhcp excluded-address 10.1.1.0 10.1.1.50
WAN Configuration
There are a few things in here which we've not covered yet, but we will in later sections.
interface GigabitEthernet8
 description ***WAN to ISP***
 ip address dhcp
 ip access-group DENY_IN in
 no ip redirects
 no ip unreachables
 no ip proxy-arp
 ip nat outside
 ip inspect ip-firewall out
 no cdp enable
 no shutdown
end
So what's going on? We'll cover the highlighted sections later on
- Selecting our WAN interface, GigabitEthernet8
- Adding a description because descriptions are good!
- Getting a DHCP address from our ISP - We'll also get a default route from the ISP as well.
- Filtering inbound traffic according to the DENY_IN ACL
- Preventing the router from sending ICMP redirect messages to internet hosts
- Preventing the router from sending ICMP unreachable messages to internet hosts
- Preventing the router from sending ARP responses to internet hosts for subnets we may own
- Enabling NAT on the interface
- Inspecting outbound traffic so we can build firewall rules
- Disabling CDP so internet devices (our ISP) can't see information from our router
- Making sure the interface is physically up
NAT Configuration
Now it's time to actually bridge LAN and WAN networks together and bind them with NAT:
First we need an ACL to say what we're NATting outbound. We could permit everything but this is not best practice, best only to allow what we've specifically configured:
ip access-list standard NATACL
 permit 10.1.1.0 0.0.0.255
Hopefully fairly self explanatory, simply creating an ACL and permitting the LAN subnet we created under the VLAN 1 SVI.
ip nat inside source list NATACL interface GigabitEthernet8 overload
Here we've got the meat of the NAT, where we're actually telling the router to translate inside interfaces matching the source list NATACL and perform Port Address Translation (PAT) or NAT overload on the Gig8 WAN port.
What about port forwarding? Let's say you've got a webserver on 10.1.1.2 which you want to be able to access by browsing to your public IP once the router is configured. Well, there's a couple of steps. The first is to forward the port on the router, so anything that tries to connect to you on port 80 gets redirected to the webserver. The next step is to allow that connection through the firewall which we'll cover later. For now, the NAT rule is the following:
ip nat inside source static tcp 10.1.1.2 80 interface GigabitEthernet8 80
So we're specifying that this translation is a static translation, translating TCP port 80 on Gig8 to port 80 on 10.1.1.2. It's that simple.
CBAC Firewall Configuration
Here's where things begin to get fun. CBAC stands for Context Based Access Control.
Effectively we can put a stateful firewall onto our router. Now you might think, why can't we just use a standard ACL and deny what we don't want inbound? Well, the problem is that ACLs are stateless - they do not care about direction.
If you make a HTTP request from your PC, a request goes out and then a response comes back in, if we block anything coming into the WAN interface how is that response going to get back? That's why we need something which is stateful!
Using the same example with CBAC, you inspect packets as they leave the WAN interface. In our example let's say we have a client on 10.1.1.5 talking to a webserver on 200.0.0.1. Our client is using a randomly generated source port of 2345 and the destination port is HTTP (80). The CBAC engine will actually build a table which contains the IP of 200.0.0.1 and port numbers 2345 and 80. So when a response comes back from 200.0.0.1:80 -> 10.1.1.5:2345 (forget NAT for the moment) the CBAC engine already knows a connection was made outbound, so allow the response back in! Clever huh!
First we have to tell the router what our CBAC inspect instance is, and what traffic to inspect:
ip inspect name ip-firewall tcp router-traffic
ip inspect name ip-firewall udp router-traffic
ip inspect name ip-firewall icmp router-traffic
This inspects all TCP, UDP and ICMP outbound, and also allows traffic from the router itself back in should it generate any. An example of router generated traffic would be something like a ping when you're testing to see if your WAN gateway is reachable, or perhaps a HTTP request made by the DDNS agent.
Next we need an ACL to put on the WAN interface so block traffic. This is the DENY_IN ACL which is in the WAN interface configuration. Unless you're wanting to do port forwarding this should effectively just deny everything! I personally like to put a deny statement in there because you can look at the number of matching packets which have effectively been blocked by your firewall:
ip access-list extended DENY_IN
 permit udp any any eq bootpc
 permit udp any any eq bootps
 permit tcp any any eq 22
 permit tcp any any eq 80
 1000 deny ip any any
Not much to explain! Block everything apart from DHCP! Now this might seem a bit counter intuitive considering what I said above about NOT wanting to block everything, but because we're inspecting outbound it'll automatically allow connections back in. For connections which are initiated outside your network, you'll need an ACL entry which is where our DHCP comes in. You only need one of these lines but for the life of me I can never remember which it is. I suspect it's bootpc but I'm too lazy to go search for it to confirm. If you forget to include the DHCP lines, you'll never get a WAN address!
I've also added a line to allow SSH and HTTP, so you can SSH into the box based on the VTY access list which we'll configure in the next section. HTTP is for the webserver which we said was running on 10.1.1.2 in our local network. You may think, why are we permitting it to the destination of any, when we could specify 10.1.1.2? Well you've got to be careful, because this ACL is checked before NAT takes place, so the destination is actually always going to be your public WAN IP, so we may as well leave this as any.
SSH Configuration
Because telnet is pretty ancient, it's much better if we use SSH for connecting to the router once it's configured. This section will focus on configuring SSH in it's pure form, but we'll touch on a few points which will be covered i the next section on VTY security.
First we'll cover some basic authentication parameters so you can actually log in once SSH is working.
aaa new-model
username david privilege 15 secret cisco
This will ensure we're using the "new" authentication, authorisation and accounting engine built into the router.
The next step is to configure a few parameters which are required to generate the keys which SSH will use:
hostname DAVE-HOME
ip domain-name dchidell.com
You might want to change these to something a little more specific to your deployment.
crypto key generate rsa modulus 2048 general-keys
ip ssh version 2
This will generate the SSH keys and force version 2. By default it'll say 1.99 is enabled, which is version 1 and 2 but since version 1 is deprecated we'll stick to v2 only.
Now for the actual VTY configuration itself:
line vty 0 4
 access-class SSHIN in
 transport input ssh
Again pretty straightforward, select the VTY lines (commonly 0-4), apply the SSHIN ACL (which we'll get to in a second) and only permit SSH inbound on the VTY line (effectively disabling telnet).
Now for the SSHIN ACL, this is basically just a list of IPs and networks we want to allow to be able to SSH into the box. This should be your local network at least. Personally speaking I like to be able to access my kit when I'm not at home. But this comes with a huge drawback, how do you know what IP you'll be coming from? Well, luckily for me, I know what IP ranges the company I work for use. So, easiest thing to do is just permit the range on my ACL, and then worst case scenario I have to go to work in order to get into the router (or VPN into work and go from there). I've got my own VPN etc which I can use, but this is after all a worst case.
ip access-list standard SSHIN
 permit 10.1.1.0 0.0.0.255
 permit 100.0.0.0 0.0.255.255
 deny any
The first permit statement allows our local network, the second allows from somewhere else (for example work in my case (although this isn't their IP range)).
Summary
We're done! That should be all you need to get basic "home router" functionality with some additional security. Below is a complete command reference if you're a bit more hardcore and want to try and do everything without reading all the fluff that I've just spent the last couple of hours writing:
interface GigabitEthernet0-7
 description ***Some device here***
 switchport access vlan 1
 switchport mode access
 no ip address
 spanning-tree portfast
 no shutdown
end

interface Vlan1
 description ***LAN clients***
 ip address 10.1.1.1 255.255.255.0
 ip nat inside
 no shutdown
end

ip dhcp pool LAN
 network 10.1.1.0 255.255.255.0
 default-router 10.1.1.1
 dns-server 208.67.222.222 208.67.220.220

ip dhcp excluded-address 10.1.1.0 10.1.1.50

interface GigabitEthernet8
 description ***WAN to ISP***
 ip address dhcp
 ip access-group DENY_IN in
 no ip redirects
 no ip unreachables
 no ip proxy-arp
 ip nat outside
 ip inspect ip-firewall out
 no cdp enable
 no shutdown
end

ip access-list standard NATACL
 permit 10.1.1.0 0.0.0.255

ip nat inside source list NATACL interface GigabitEthernet8 overload
ip nat inside source static tcp 10.1.1.2 80 interface GigabitEthernet8 80

ip inspect name ip-firewall tcp router-traffic
ip inspect name ip-firewall udp router-traffic
ip inspect name ip-firewall icmp router-traffic

ip access-list extended DENY_IN
 permit udp any any eq bootpc
 permit udp any any eq bootps
 permit tcp any any eq 22
 permit tcp any any eq 80
 1000 deny ip any any

aaa new-model
username david privilege 15 secret cisco

hostname DAVE-HOME
ip domain-name dchidell.com

crypto key generate rsa modulus 2048 general-keys
ip ssh version 2

line vty 0 4
 access-class SSHIN in
 transport input ssh

ip access-list standard SSHIN
 permit 10.1.1.0 0.0.0.255
 permit 100.0.0.0 0.0.255.255
 deny any
Enjoy!