Cisco IOS SSL WebVPN
Problem
You're away from home, but want to grab something from your file server, perhaps you want to change some configuration on a box? How? Well, you could port forward everything you need but that opens up lots of security holes. A more practical solution is a VPN.
So, what's the best VPN for the job? Depends on what you've got handy. As it happens I use a Cisco 897 router which supports VPN termination, perfect! So, why not use the slightly more old-school IPSec VPN? Well, turns out a lot of service providers are realising that people like to use a VPN to avoid traffic data collection and so the service providers do not make any money! SSL VPN gets around this problem by using effectively HTTPS to tunnel local traffic to a VPN server. Everywhere lets you use HTTPS and that's all you need to get it working!
We'll cover the following topics:
- Router configuration on the Cisco 897 platform
- SSL Certificate generation and integration into IOS
- Cisco ACS authentication with multiple VPN profiles
Solution
How do we proceed? Well, there are a few items on the shopping list we'll need:
-
A Cisco WebVPN platform. In this case it's a Cisco 897 router. Quite a few platforms support this, possibly even the 1800 series making this a cheap option for a services router.
-
The Cisco AnyConnect VPN Client. Fortunately I have a Cisco account which allows me to download this software. More information on this below.
-
An SSL certificate. Well, you don't actually NEED one, but without one your users will have to bypass multiple SSL errors, and it just doesn't look very good. Since you can get these for free it's worth doing.
-
A web domain (this is for the SSL cert).
-
Some patience because sods law it won't work first time.
First, let's get the real basic configuration over with:
Router Configuration
webvpn gateway VPNGW
 ip interface GigabitEthernet8 port 443
 ssl encryption 3des-sha1
 ssl trustpoint CA_TP
 inservice
 dtls port 3000
This first block defines the actual interface to the VPN instance. It's all fairly self explanatory however I'll go through the lines:
webvpn gateway VPNGW - Defines the name of the VPN gateway
ip interface GigabitEthernet8 port 443 - Listens on port 443 of Gig8 (my WAN interface)
ssl encryption 3des-sha1 - Sets the SSL encryption method. Don't use rc4-md5! It's outdated and just won't work! (Thanks Joe)
ssl trustpoint CA_TP - This points to the SSL trustpoint we'll create later.
inservice - Effectively a "no shut" on the VPN instance
dtls port 3000 - Datagram Transport Layer Security (dtls) port number. This port is the port used to transport data for higher speed VPN connections.
Now we've got a big chunk:
webvpn context VPNCONTEXT
 title "My WebVPN!"
 color grey
 secondary-color black
 title-color #669999
 login-message "Welcome! Please login to the VPN."
 virtual-template 1
 aaa authentication list VPNLOGIN
 gateway VPNGW
 logging enable
 !
 ssl authenticate verify all
 inservice
 !
 policy group VPNPOLICY
   functions svc-enabled
   functions svc-required
   timeout idle 86400
   timeout session 1209600
   svc address-pool "VPNPOOL" netmask 255.255.255.255
   svc keep-client-installed
   svc profile VPN_PROFILE
   svc rekey method new-tunnel
   svc split include 10.0.0.0 255.0.0.0
   svc dtls
   mask-urls
 !
 default-group-policy VPNPOLICY
!
end
webvpn context VPNCONTEXT - Creates the VPN context itself and defines a name
title "My WebVPN!" - Title displayed on the login page
color grey - Tweak to your preference
secondary-color black - Tweak to your preference
title-color #669999 - Tweak to your preference
login-message "Welcome! Please login to the VPN." - Tweak to your preference
virtual-template 1 - This defines the logical interface users will come into
aaa authentication list VPNLOGIN - Our AAA authentication list for particular users
gateway VPNGW - Defines the VPN gateway we're going to use. This references the previous code block.
logging enable - If you can't guess this one, go watch some reality TV or something
ssl authenticate verify all - I've got no idea, it's created by default when defining a webvpn context. Documentation is rather scarce.
inservice - Same as the previous inservice, brings the context online.
policy group VPNPOLICY - Defines the login policy. It is possible to have multiple policies for different users. More on this later
functions svc-enabled - Actually allows the user to establish a tunnel
functions svc-required - Requires the user to use the anyconnect client
timeout idle 86400 - Maximum idle time (mine is a day)
timeout session 1209600 - Maximum session time (mine is 14 days)
svc address-pool "VPNPOOL" netmask 255.255.255.255 - Defines the pool of addresses from which clients will get an IP (more below)
svc keep-client-installed - Keeps the SSL client installed after the VPN connection is closed.
svc profile VPN_PROFILE - Defines the VPN client profile information to use. More information on this later.
svc rekey method new-tunnel - Defines the method for tunneling re-keys.
svc split include 10.0.0.0 255.0.0.0 - This is an important one. This defines the networks you wish to tunnel through the VPN. You can add multiple lines for multiple networks or remove the command entirely to forward everything!
svc dtls - Enable DTLS. Recommended, it improves performance dramatically.
mask-urls - Obfuscates corporate URLs. Not really sure why this was in mine, but meh, why not.
default-group-policy VPNPOLICY - When a client connects they'll use the VPNPOLICY we've defined as a default. This doesn't make sense with a single policy, but with multiple configured, it does.
Misc Bits of config
crypto vpn anyconnect flash:/webvpn/anyconnect-win-4.1.04011-k9.pkg sequence 1
This defines the anyconnect packages. Typically you enter this command without the "webvpn" section after "flash:" and the router will unpackage and install the .pkg file you specify into the flash and alter the command in the running configuration.
crypto vpn anyconnect profile VPN_PROFILE flash:/RDProfile.xsd
Specifies the client profile information. This is not mandatory but you can specify some rather nice features in here which can be quite helpful. More details later.
ip local pool VPNPOOL 10.0.100.5 10.0.100.100
Defines the pool of addresses to use for VPN clients, as specified in the svc address-pool "VPNPOOL" netmask 255.255.255.255 line above.
aaa authentication login VPNLOGIN group radius local
Defines the AAA list for logging into the VPN. I use RADIUS but you can use whatever you like (local is fine). Later we'll cover using a RADIUS server (Cisco ACS) to define rules to allow us to connect to multiple profiles.
Now you should theoretically have a working solution. The only missing part here is the SSL trustpoint we defined earlier as CA_TP but have not created. You CAN use the self signed cert that the router will generate, but you'll get the SSL cert error. So we'll cover doing a proper job in a little while.
Client Profile info
Well, I did say a little later so here goes.
crypto vpn anyconnect profile VPN_PROFILE flash:/RDProfile.xsd Remember this line?
You should. This as mentioned above is optional but I highly suggest you take the time and look into this part because it contains a couple of lovely useful features.
It seems that the clients can actually set information by means of an XML file, which you can either write manually or generate with the official Cisco tool known as the "AnyConnect Profile Editor".
I've written this XML document manually, and only looked into a few available options, but here's mine:
<?xml version="1.0" encoding="utf-8"?>

<!--Cisco AnyConnect Profile - ASA-->

<AnyConnectProfile xmlns="http://schemas.xmlsoap.org/encoding/" xmlns:xsi="http://www.w3.org/2001/XMLSchema-instance" xsi:schemaLocation="http://schemas.xmlsoap.org/encoding/    AnyConnectProfile.xsd">

        <ClientInitialization>
                <WindowsVPNEstablishment>AllowRemoteUsers</WindowsVPNEstablishment>
                <RetainVpnOnLogoff>true</RetainVpnOnLogoff>

                <AutoReconnect UserControllable="true">true
                        <AutoReconnectBehavior
                        UserControllable="true">ReconnectAfterResume</AutoReconnectBehavior>
                </AutoReconnect>
        </ClientInitialization>

        <ServerList>
        <HostEntry>
        <HostName>yourdomain.com</HostName>
        </HostEntry>
        </ServerList>
</AnyConnectProfile>
Basically, what this will do, is maintain the VPN connection when you put the PC into standby. It will also reconnect automatically if you lose connection as well as keep an entry within AnyConnect for your VPN so you don't have to type in the URL every time.
That's literally all this does, but I find it unbelievably useful as I'm able to maintain VPN connections when on a train or on a public unreliable connection without having to manually reconnect each time.
To allow this to work, just upload the XML file to the routers flash, and add the line of config listed above (provided your filename is the same!).
SSL Certificate Generation
Now comes the tricky part. Well, I suppose it's actually fairly straightforward, but personally speaking I'm not a fan of certificate services. They always seem rather complicated.
I use StartSSL (http://www.startssl.com) as they provide free certificate services. Their free certificates only last a year, but that's not a problem for me. I could go and buy one, but, it's just a basic VPN and takes about 10-15 minutes to put a cert on the router once you know what you're doing.
Generating a certificate is beyond the scope of this post, there is plenty of documentation on the StartSSL website on how to generate certificates. Personally speaking I've used the OpenSSL mechanism and the windows program.
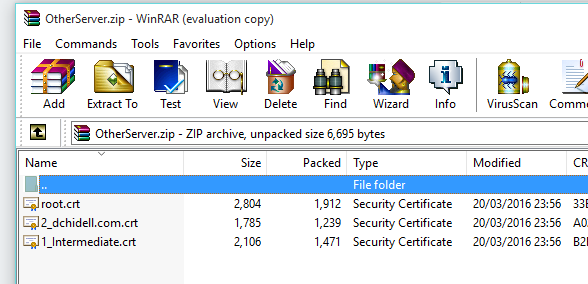
Following the creation of a certificate you should be able to download the private key used in the generation of the certificate, as well as the certificate, root certificate and intermediate certificates. You should end up with a private key locally (if you used the windows executable), and a file names mydomain.com.zip with your information in. Within this file you should have another zip called OtherServer.zip containing the SSL cert, the root cert and the intermediate cert.
Now, the next step is to alter the private key file format. We need it compatible with the router which uses DES or 3DES but StartSSL encryps the key using AES. The easiest option is a linux box with openssl installed. Use the following command to convert your private key from AES to 3DES:
openssl rsa -in your-key.pem -out new-key-des3.pem -des3
OpenSSL will prompt for a password on this command, use the password you used to create the key via StartSSL.
Now it's time to import everything into the router, we'll have to import 4 components. The root certificate (root.crt), the CA intermediate certificate (1_intermediate.crt), the private key (new-key-des3.pem) and the actual SSL cert (2_dchidell.com.crt).
Creating the CA_ROOT trustpoint:
KI-897(config)#crypto pki trustpoint CA_ROOT
KI-897(ca-trustpoint)#enrollment terminal pem
KI-897(ca-trustpoint)#exit
KI-897(config)#
Adding the root certificate to CA_ROOT:
When prompted to paste in the certificate, use root.crt (opened in notepad)
KI-897(config)#crypto pki authenticate CA_ROOT

Enter the base 64 encoded CA certificate.
End with a blank line or the word "quit" on a line by itself

-----BEGIN CERTIFICATE-----
Zzrd/qqc8NSLf3Iizsafl7b4r4qgEKjZ+xjGtrVcUjyJthkqcwEKDwOzEmDyei+B
26Nu/yYwl/WL3YlXtq09s68rxbd2AvCl1iuahhQqcvbjM4xdCUsT37uMdBNSSwID
cut
FE4L7xqkQFulF2mHMMo0aEPQQa7yMGQGA1UdHwRdMFswLKAqoCiGJmh0dHA6Ly9j
LnN0YXJ0Y29tLm9yZy9zZnNjYS1jcmwuY3JsMIIBXQYDVR0gBIIBVDCCAVAwggFM
-----END CERTIFICATE-----

Certificate has the following attributes:
       Fingerprint MD5: xxxxxxxxxxxxxxxxxxxxxxxxxxxxxxxxxx
      Fingerprint SHA1: xxxxxxxxxxxxxxxxxxxxxxxxxxxxxxxxxx

% Do you accept this certificate? [yes/no]: yes
Trustpoint CA certificate accepted.
% Certificate successfully imported

KI-897(config)#
Creating the SSL certificate trustpoint:
KI-897(config)#crypto pki trustpoint CA_TP
KI-897(ca-trustpoint)#enrollment terminal pem
KI-897(ca-trustpoint)#exit
KI-897(config)#
Open the intermediate certificate, private key and SSL cert files in notepad and paste them into the router when prompted, in the following order:
- Intermediate Certificate
- Private Key
- SSL Certificate
Adding the intermediate certificate, private key and SSL cert:
KI-897(config)#crypto pki import CA_TP pem terminal password passwordhere

% Enter PEM-formatted CA certificate.
% End with a blank line or "quit" on a line by itself.

-----BEGIN CERTIFICATE-----
MIIDrTCCAxagAwIBAgIBATANBgkqhkiG9w0BAQQFADCBoDELMAkGA1UEBhMCVVMx
CzAJBgNVBAgTAk1BMRMwEQYDVQQHEwpCb3hib3JvdWdoMRgwFgYDVQQKEw9SdXN0
cut
AKC9izT+RkBQ8lUOK2VsLMYSi7a6uAzJwUwfIezYevl9U1AgQKrO++GvKKaTwfcS
NerJajut7JZr+JOh4+Ai16Ccz7yZjqZ8/lFmB0dDzJGlib5ASE0eiy/+azp6GFG1
-----END CERTIFICATE-----
quit

% Enter PEM-formatted encrypted private key.
% End with "quit" on a line by itself.

-----BEGIN RSA PRIVATE KEY-----
Proc-Type: 4,ENCRYPTED
DEK-Info: DES-EDE3-CBC,C33CAD1289ACFEFA

J9YQleEpRFS2otCWKJJUm9N6mul6bvZCyJNe8B/fRxApPVP944SqN1Mjf6ZiDhHN
GDSyVSxwSmdkqhWdYW9wWy3nbcJ8On005jfvpmlmnMtLRJS95doDF0MhdD59RI2O
cutz
7EqshltIRPT/nZAwOVPmcEFQZ3CaOL0tO9Z5+j9hstj3IIqFhU8CXgUhH3ofuPAE
gjL6O0U13TydXtNAzR4/jTX5M+6EQrQNNor8RW9zfH/ATA2+Kmr1bfsMn+tQJsop
-----END RSA PRIVATE KEY-----

quit

% Enter PEM-formatted certificate.
% End with a blank line or "quit" on a line by itself.
-----BEGIN CERTIFICATE-----
VQQIEwJNQTETMBEGA1UEBxMKQm94Ym9yb3VnaDEWMBQGA1UEChMNVGFuayBEb2cg
VG95czEUMBIGA1UECxMLVGFuayBTdGlja3MxFTATBgNVBAMTDHd3dy50YW5rLmNv
cut
ZVwD+yZo03H3c6EnxFVmEW4kwHZfICq2YklHpROMSozC+M7i6p+NAgMBAAEwDQYJ
8awdXCJ/gwmOGc7xJt6cOKDXnHjAvEsHcm8A7GQ2aROvJL3y3ozNeqdxhH3dwH0=
-----END CERTIFICATE-----
quit

% PEM files import succeeded.
KI-897(config)#
Now you should be good to go! You may need to go under the VPN gateway and "no inservice" and "inservice" the instance to accept the new certificate.
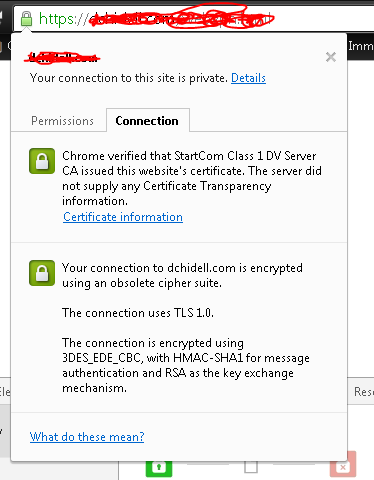
For whatever domain you're using (and for the domain you generated the certificate for) you'll have to use this to connect to your VPN. Anything else will result in a certificate error, since you're connecting to a URL which does not have a certificate. If you have a dynamic IP you'll need a dynamic DNS service, there's plenty online to choose from.
Multiple VPN policies
Until recently I've found that this VPN solution has been more than satisfactory in terms of functionality. However there was something missing. It's all well and good being able to get into your home network using the split tunnels we've created using the svc split include command but what if you want to create a full tunnel (as in a default route)? Well, you could VPN in, connect to your router, modify the policy and reconnect to the VPN. But that is the definition of ball ache in it's pure form.
So, to address this problem we can actually create multiple VPN policies within the webvpn instance itself. We've already got our initial policy as described above:
policy group VPNPOLICY
   functions svc-enabled
   functions svc-required
   timeout idle 86400
   timeout session 1209600
   svc address-pool "VPNPOOL" netmask 255.255.255.255
   svc keep-client-installed
   svc profile VPN_PROFILE
   svc rekey method new-tunnel
   svc split include 10.0.0.0 255.0.0.0
   svc dtls
   mask-urls
So, we can add another for tunneling traffic using a default route. It's as easy and modifying this policy, giving it a new name and changing a few of the attributes. An identical policy but with a default route would appear as follows:
policy group VPNPOLICY_FULL
   functions svc-enabled
   functions svc-required
   timeout idle 86400
   timeout session 1209600
   svc address-pool "VPNPOOL" netmask 255.255.255.255
   svc keep-client-installed
   svc profile VPN_PROFILE
   svc rekey method new-tunnel
   svc dtls
   mask-urls
Note: The only changes here is the removal of the svc split include command (which forces the VPN to be a default gateway and thus tunnels all traffic).
Our new full WebVPN configuration is then as follows:
webvpn context VPNCONTEXT
 title "My WebVPN!"
 color grey
 secondary-color black
 title-color #669999
 login-message "Welcome! Please login to the VPN."
 virtual-template 1
 aaa authentication list VPNLOGIN
 gateway VPNGW
 logging enable
 !
 ssl authenticate verify all
 inservice
 !
 policy group VPNPOLICY
   functions svc-enabled
   functions svc-required
   timeout idle 86400
   timeout session 1209600
   svc address-pool "VPNPOOL" netmask 255.255.255.255
   svc keep-client-installed
   svc profile VPN_PROFILE
   svc rekey method new-tunnel
   svc split include 10.0.0.0 255.0.0.0
   svc dtls
   mask-urls
 !
 policy group VPNPOLICY_FULL
   functions svc-enabled
   functions svc-required
   timeout idle 86400
   timeout session 1209600
   svc address-pool "VPNPOOL" netmask 255.255.255.255
   svc keep-client-installed
   svc profile VPN_PROFILE
   svc rekey method new-tunnel
   svc dtls
   mask-urls
 !
 default-group-policy VPNPOLICY
!
end
You can define as many policies as you like, which is all well and good, but how do we go about using them? I'll cover two methods for actually authenticating users against different policies, RADIUS and local.
Local Policy Authentication
This is a nice simple solution, defining local users on the router and assigning them to different VPN policies, an example would be below:
aaa authorization network VPNLOGIN local
!
aaa attribute list DefaultVPNPolicy
 attribute type user-vpn-group "VPNPOLICY"
aaa attribute list FULLVPNPolicy
 attribute type user-vpn-group "VPNPOLICY_FULL"
!
username user1 secret cisco
username user1 aaa attribute list DefaultVPNPolicy
username user2 secret cisco
username user2 aaa attribute list FULLVPNPolicy
username user3 secret cisco
!
webvpn context VPNCONTEXT
 aaa authorization list VPNLOGIN
Let's break this down.
The first line aaa authorization network VPNLOGIN local is just defininf our AAA list, to use local authentication, nice and straightforward.
aaa attribute list DefaultVPNPolicy
 attribute type user-vpn-group "VPNPOLICY"
This section defines a single attribute list and sets the name of the VPN policy we wish to map that attribute list to. Note that "VPNPOLICY" matches the name of my first (default) policy within the WebVPN context. The next attribute list matches the default route policy we just created, again, note that the name is important: "VPNPOLICY_FULL".
username user1 secret cisco
username user1 aaa attribute list DefaultVPNPolicy
Now we create users and assign them to the defined attribute lists. In the above configuration you'll notice that we've created 3 users, assigned user1 to the DefaultVPNPolicy, user2 to the FULLVPNPolicy and not assigned user 3 to any policy. So, what happens to user3? Well, that's where the line default-group-policy VPNPOLICY comes in, and will assign otherwise unassigned users to the policy defined here.
Remote Policy Authentication (Cisco ACS)
Now for the more tricky part. I use ACS with RADIUS authentication for my VPN.
The important part here is to use RADIUS attributes to set the policy name based on some condition. The condition I'm using is the presence of a user in a particular group of active directory. This means all I have to do to allow a user to connect to the VPN is add them to a particular AD group, and depending on the group I add them to they get a different set of routes! And some people wonder why I have AD and ACS running at home!
Now, this isn't going to cover how to actually build the entire ACS environment, because that's beyond the scope of this particular post (shot myself in the foot here - now I've got to go write one on ACS).
Basically, for each VPN policy you have, create an additional Authorization Profile within ACS, and assign the attribute according to the screenshot below:
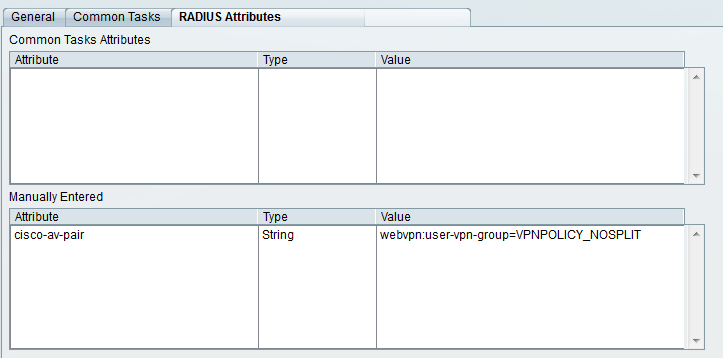
The important part here is the attribute of cisco-av-pair and the value of webvpn:user-vpn-group=VPNPOLICY_NOSPLIT. The latter component defines the policy you wish to connect to. If in our example we wanted to connect to the full tunnel - default route policy we would define the attribute as the following: webvpn:user-vpn-group=VPNPOLICY_FULL
Summary
Alright, so this is a pretty hefty article. If you're looking for a quick overview, this is it.
Below is a quick and dirty config you should be able to use to "simply get it working" without any of the little extra features we've spoken about in other sections:
crypto vpn anyconnect flash:anyconnect-win-4.1.04011-k9.pkg sequence 1
!
ip local pool VPNPOOL 10.0.100.5 10.0.100.100
!
aaa authorization network VPNLOGIN local
!
webvpn gateway VPNGW
 ip interface GigabitEthernet8 port 443
 ssl encryption 3des-sha1
 inservice
 dtls port 3000
!
webvpn context VPNCONTEXT
 title "My WebVPN!"
 color grey
 secondary-color black
 title-color #669999
 login-message "Welcome! Please login to the VPN."
 virtual-template 1
 aaa authentication list VPNLOGIN
 gateway VPNGW
 logging enable
 !
 ssl authenticate verify all
 inservice
 !
 policy group VPNPOLICY
   functions svc-enabled
   functions svc-required
   timeout idle 86400
   timeout session 1209600
   svc address-pool "VPNPOOL" netmask 255.255.255.255
   svc keep-client-installed
   svc rekey method new-tunnel
   svc split include 10.0.0.0 255.0.0.0
   svc dtls
   mask-urls
 !
 default-group-policy VPNPOLICY
!
end
References
https://forum.startcom.org/viewtopic.php?f=15&t=1643 - Cisco router SSL certificate with StartSSL
https://supportforums.cisco.com/document/12445581/steps-configure-multiple-webvpn-policy-groups-cisco-ios-and-microsoft-nps-server - RADIUS WebVPN policies
http://www.cisco.com/c/en/us/td/docs/ios/12_4t/12_4t11/htwebvpn.html - Cisco WebVPN command reference
https://software.cisco.com/download/release.html?mdfid=286281283&flowid=72322&softwareid=282364313&release=4.2.02075&relind=AVAILABLE&rellifecycle=&reltype=latest - Cisco AnyConnect downloads (including profile editor).
http://resources.intenseschool.com/using-the-cisco-routers-local-database-to-apply-different-policies-for-cisco-ios-anyconnect-users-2/ - Local VPN policy with AAA
Acknowledgements
Joe B - For confirming some attributes and letting me know about the SSL encryption cypher. He's also responsible for letting me know about the ability to run multiple VPN profiles (which I've not written about yet).
Catherine E - For constantly proof reading these and finding my fairly careless mistakes as well as providing multiple angles of technical insight.
Billy G - For being that pain who constantly demands more from his network administrator to the point where I still just get on with it.